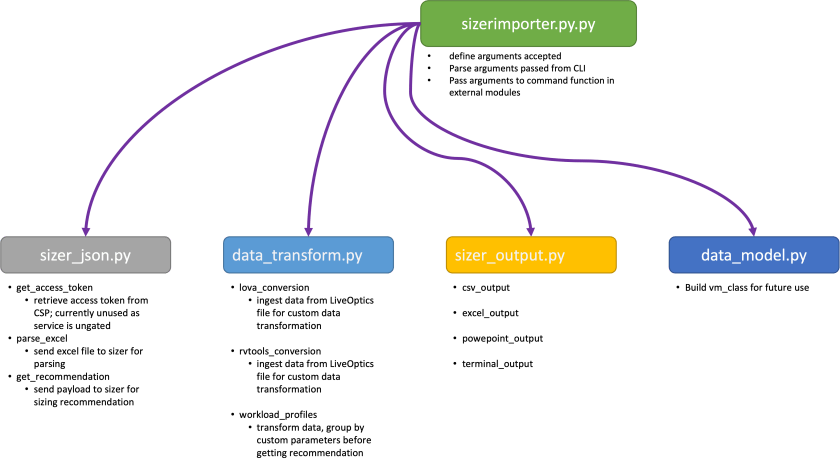
Introducing the VMware Cloud Sizer Companion CLI! This is a python-based client that can be used to model workloads in VMware Cloud… quickly, easily, repeatedly, and reliably!
Overview
I am really excited to introduce everyone to my latest passion project – the VMware Cloud Sizer Companion CLI! (It’s a clunky name, I know, but it is what it is!) Admittedly, this is probably not something that will be interesting to everyone, but as a pre-sales solution architect I spend a LOT of time thinking about how to optimize a customer’s cloud environment. I have posted about my adventures with sizing workloads previously – here, here, and here. As I discussed in those articles, I frequently run multiple scenarios for any given engagement with a customer… evaluating powered on vs. off workloads, comparing used vs. provisioned storage and memory, splitting workloads between different clusters, etc. I know this is something my colleagues in the partner community are also concerned with, so hopefully our friends in the partner ecosystem will find this useful as well.
For those of you who aren’t already aware, the VMware Cloud Sizer is the ‘source of truth’ for modeling workloads against VMware Cloud on AWS (and soon, Google Cloud VMware Service, VMware Cloud on Equinix, and so on). If you are considering migrating some virtual machines to VMware Cloud, this SHOULD be your first stop for understanding how large / small an environment you might need. The VMware Cloud Sizer is a web-based interface that allows you to either model an environment quickly based on average VM characteristics, or to upload a collection file from RVTools or LiveOptics, as well as a host of additional features.
Supported Features
Even though it’s only a couple weeks old, the VMware Cloud Sizer Companion CLI already supports the following features:
- Ingest either a LiveOptics or RVTools file
- Provide a quick review (“view_only”) option to summarize the environment
- Retrieve a sizing recommendation for the environment
- Create workload profiles based on:
- Current vm:cluster distribution – all clusters
- Current vm:cluster distribution – some clusters
- Guest OS based on text string filter
- VM name based on text string filter
- Include all VM, or only those powered on / suspended
- Present results on-screen
- Identify VM exceptions or host incompatibilities
- Optionally save to PDF as well
There is a decent list of things yet to be introduced to the companion CLI:
- options for ‘provisioned’ vs. ‘consumed’ storage
- powered on / off / suspended VM
- selection / enforcement of specific host types
- SDDC configuration options (appliance size, preferred FTT / FTM, etc.
However, while it may not yet support all the features of the full Sizer web application, the benefit of using the VMware Cloud Sizer Companion CLI is that we have the opportunity to transform the data in any way we like before requesting a sizing recommendation! For example, we can create workload profiles by cluster, VM Name, or Guest Operating system simply by using a text search string.
Getting help
To get help for the tool, simply run:
./sizerimporter.py -h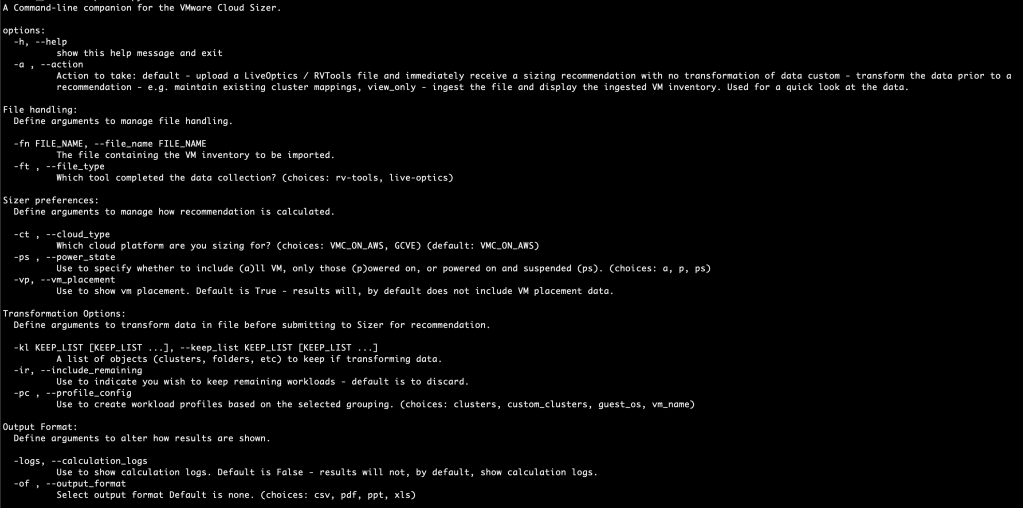
The workflow for the VMware Cloud Sizer Companion CLI is as follows:
- Ingest a file
- Get an overview of the environment
- Select options to receive a sizing
- Select output options
Get an overview of the environment
Let’s assume you have an RVTools file with the virtual machine data you want to use.
First, get an overview of the environment:
./sizerimporter.py -fn rvtools_file.xlsx -ft rv-tools -a view_onlyThe returned data gives you an idea of what you are working with:
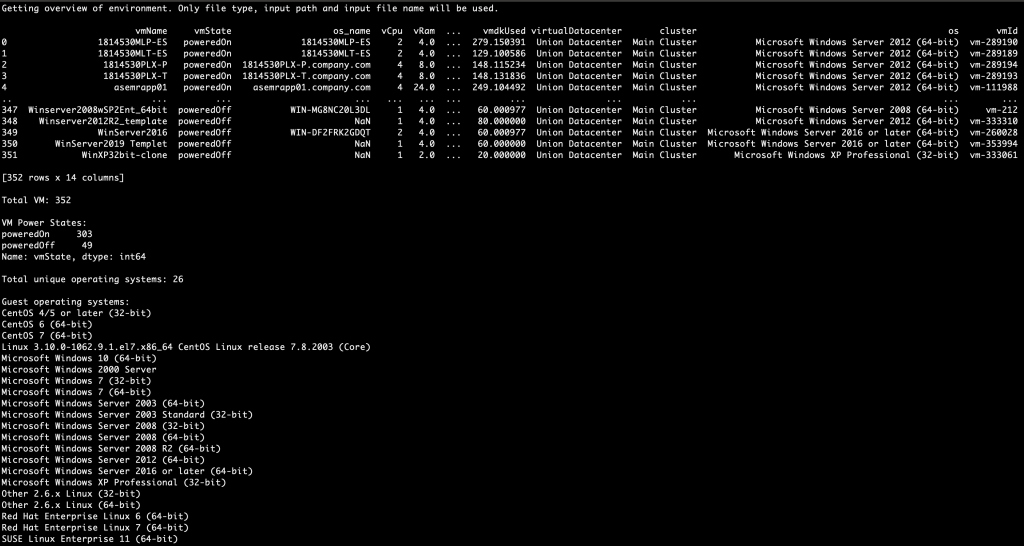
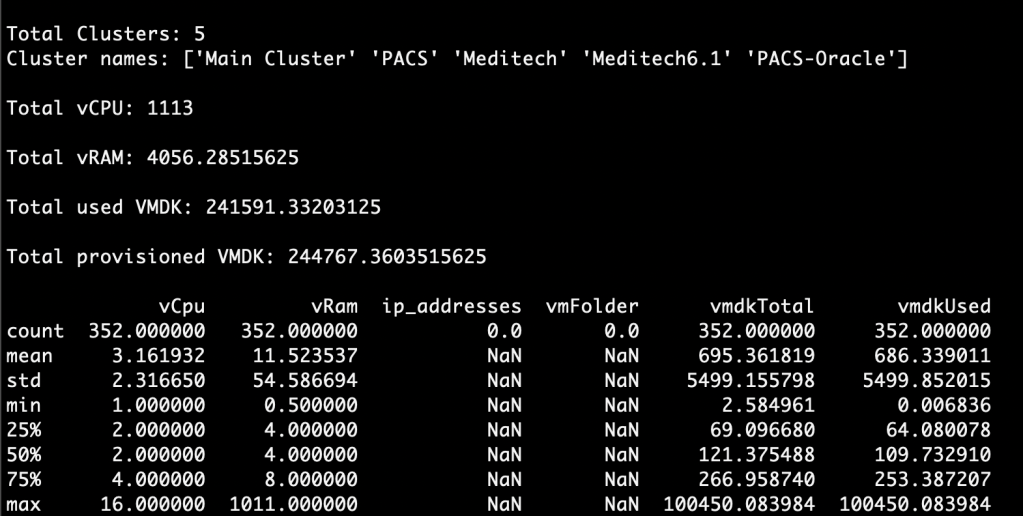
You can see that you receive some information on the total number of VM, clusters, different operating systems, and some metrics about VPU, memory and VMDK configurations and utilization.
Getting a Default Sizing
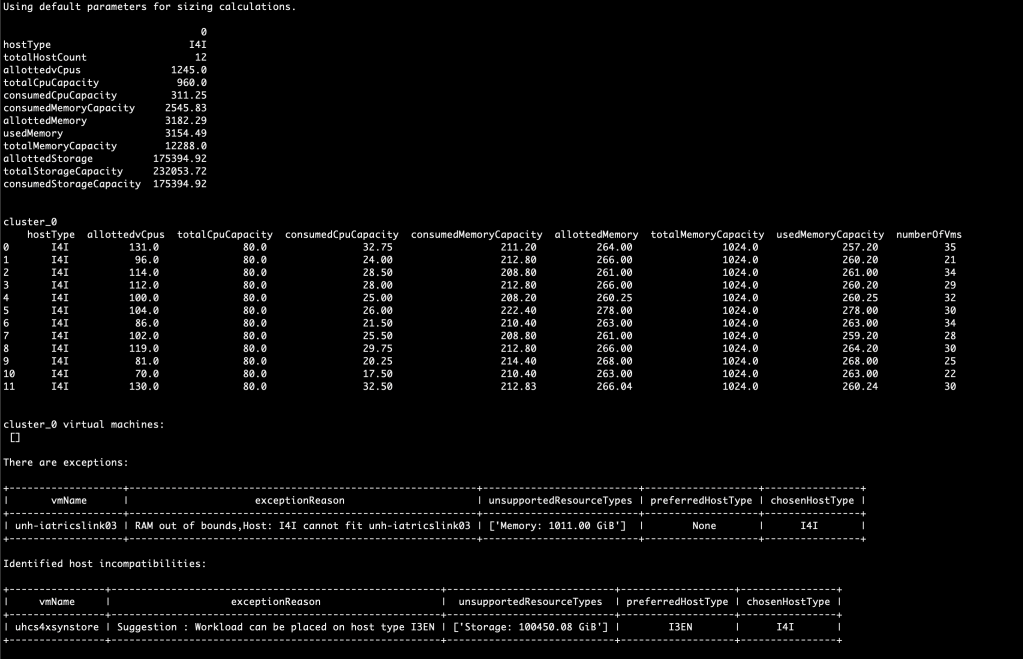
You can very easily simply submit the data for a sizing recommendation as-is:
./sizerimporter.py -fn rvtools_file.xlsx -ft rv-tools -a default(get a PDF of the results just by adding “–output_format PDF” to your command)
Here are the results – note that virtual machines that can not be placed or that can only be placed on certain host types are identified and called out:
Create workload profiles by cluster
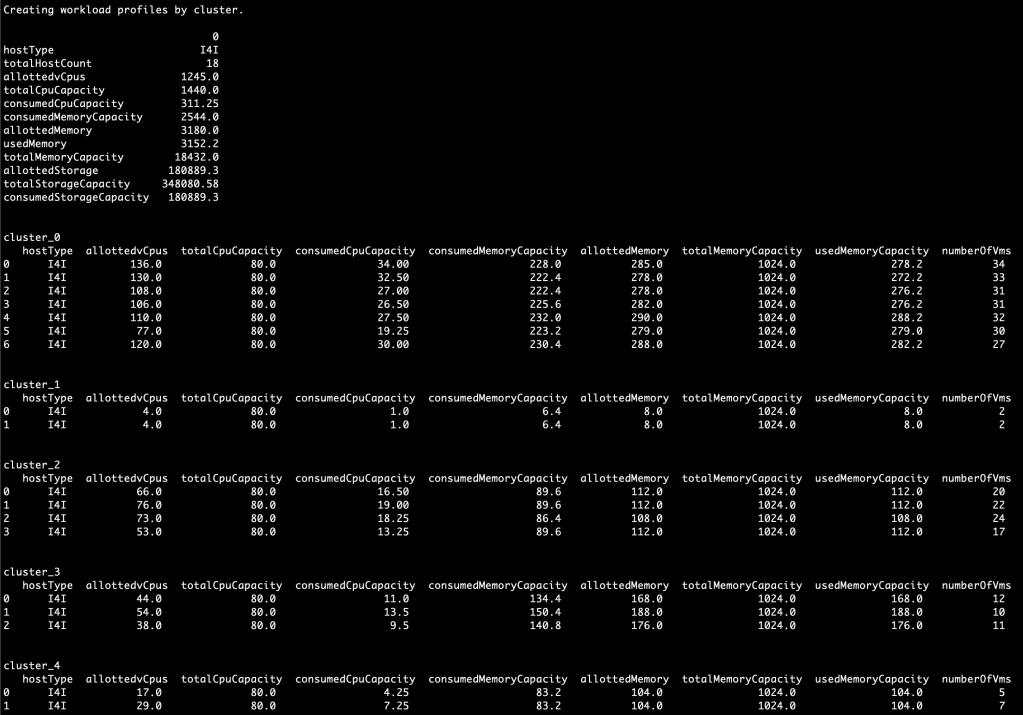
If you prefer to maintain cluster separation as it already exists in the environment:
./sizerimporter.py -fn rvtools_file.xlsx -ft rv-tools -a custom -wp clustersAnd you can see it automagically separates workloads by cluster, and maintains current cluster mappings!
Keeping only certain clusters
What if you only want to keep SOME of the existing clusters? Let’s try the following:
./sizerimporter.py -fn rvtools_file.xlsx -ft rv-tools -a custom -wp \
custom_clusters -pl PACS Meditech Meditech6.1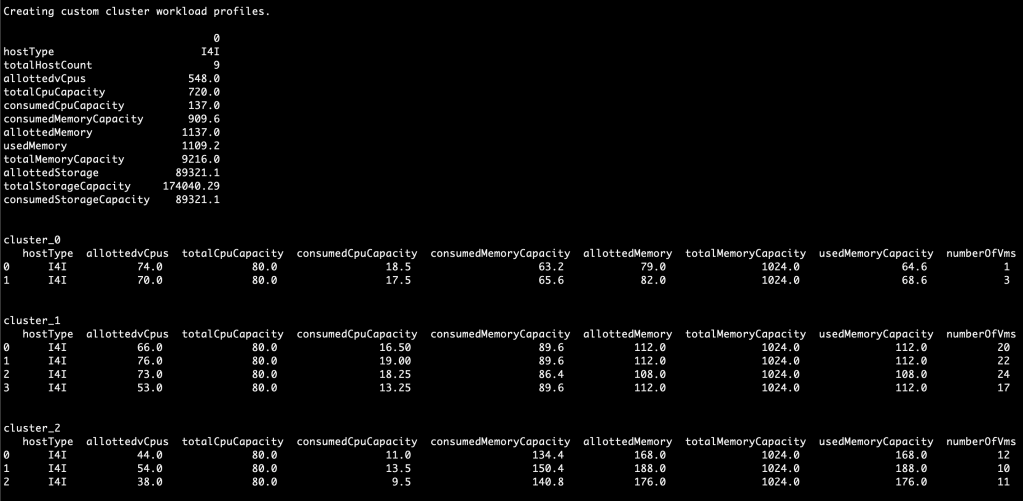
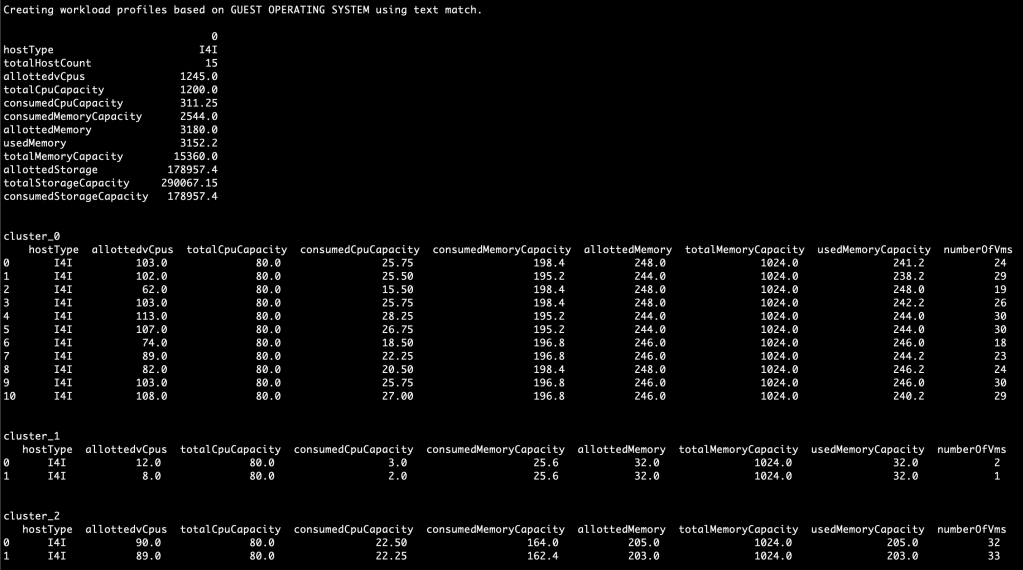
Creating a workload profile based on guest operating system
As a final example, here we are creating a workload profile for Windows Server, another for Red Hat Enterprise, and a third for everything else:
Conclusion
The great thing about this tool –
- it’s FAST!
- it’s repeatable!
- it’s 100% scriptable!
- it’s extensible!
This will (hopefully) make creating models for you or your customers much easier over time! Certainly it is not what I would yet call ‘feature complete’ – but I think we’re off to a great start!
Currently the project is hosted here on Github – though we will soon move to a new home on the VMware org on Github.
Update January 31, 2023
I am happy to report this project has been officially been published as a part of the VMware collection of projects on Github!
Update Februyary 7, 2023
New release on Github:
- Get results for EITHER VMC on AWS or Google Cloud VMware Engine (GCVE)
- Include all VM, or only those powered on / suspended
- Include specific workloads by VM Name, cluster, or Guest operating system
- Exclude specific workloads by VM Name, cluster, or Guest operating system
- Create workload profiles based on:
- Current vm:cluster distribution – all clusters
- Current vm:cluster distribution – some clusters
- Guest OS based on text string filter
- VM name based on text string filter
- Identify VM exceptions or host incompatibilities
- Present results on-screen
- Optionally get a PDF
Update February 20, 2023
New release on Github:
- refactored to support subcommands – this will better support new functionality in the future, e.g. quick sizing, reverse sizing, ect
- updated README and documentation / screen shots
- fixed a couple bugs
Update March 10, 2023
New release on Github:
- ability to import multiple files at once (provided same type and version)
- ability to select preferred node type
- ability to specify stretched vs. single AZ
- ability to specify provisioned vs. utilized storage
