In Part 1 and Part 2 of this series, I discussed the theory behind how one might influence the default route in VMC on AWS, particularly when used with an AWS Transit Gateway. In the final post for this series, I will walk through the steps necessary to successfully advertise the default route from an attached VPC through a Transit Gateway.
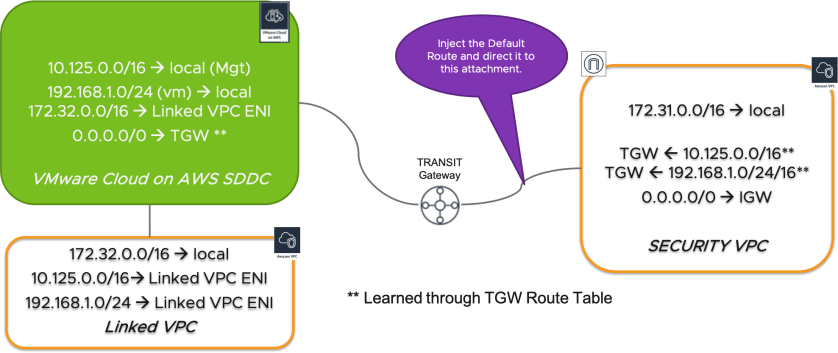
For the purposes of this article, I will return to the following, relatively simple architecture:

In the diagram, we are looking to place a pair of load-balanced firewalls in the “Security VPC” – which also means the default route (0.0.0.0/0) for the entire environment must point to the EC2 firewall instances in that VPC. For us to achieve this result, we must achieve a routing infrastructure as follows:

As we see in the screen shots below, I have a Software Defined Datacenter in VMC on AWS:


You can see that the SDDC has a management CIDR of 10.125.0.0/16, and (not shown) a single compute segment of 192.168.1.0/24.
Leveraging the most excellent PowerCLI modules for VMC and NSX-T from William Lam’s blog, we can quickly and easily pull the routing table from the SDDC, as shown below:

Connecting to VMC… 
While there are clearly a number of networks the routing table has entries for, I have circled in red those for the management CIDR (10.125.0.0/16), the linked VPC (172.32.0.0/16), and the default route (0.0.0.0/0). You can clearly see the default route pointing to an address local to the management CIDR – notice also the administrative distance has been set artificially high, which will allow it to be overridden.
I have also built out a native VPC in AWS, using the 172.31.0.0/16 CIDR, along with subnets for each availability zone:


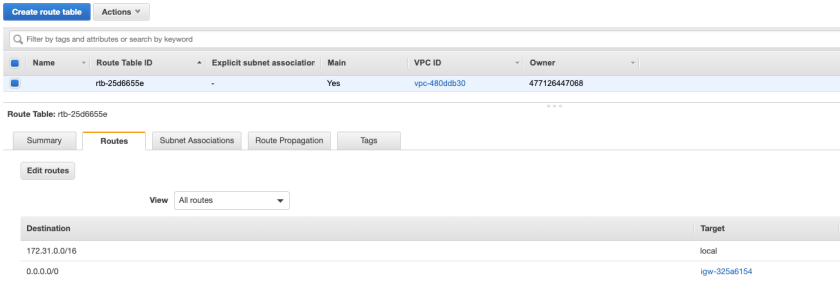
As you can see, the route table for the VPC contains only the 172.31.0.0/16 CIDR.
In order to achieve the routing result depicted at the beginning of this post, we must complete the following.
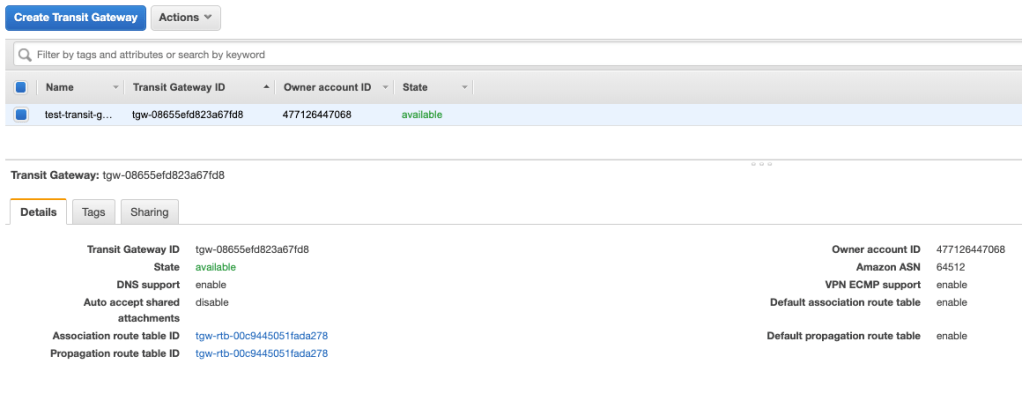
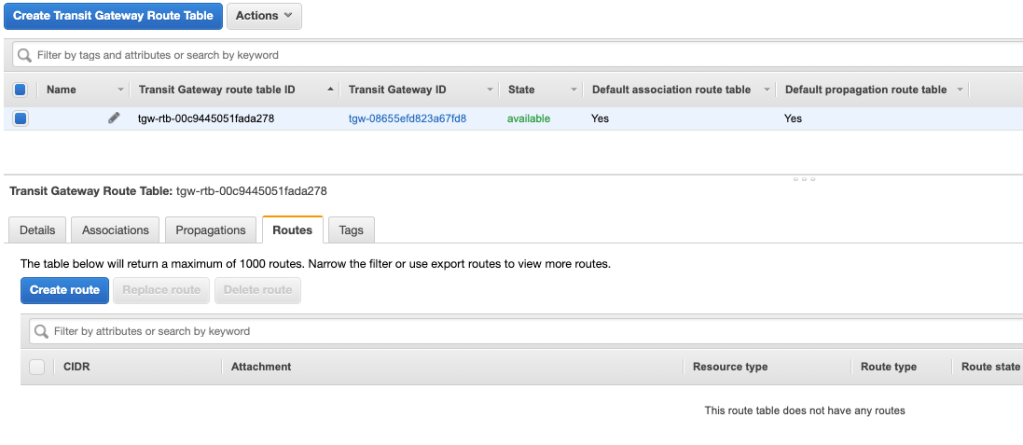
1- Create a Transit Gateway
As you can see below, I have created a transit gateway – as nothing is attached to the gateway yet, the route table for the TGW is empty.
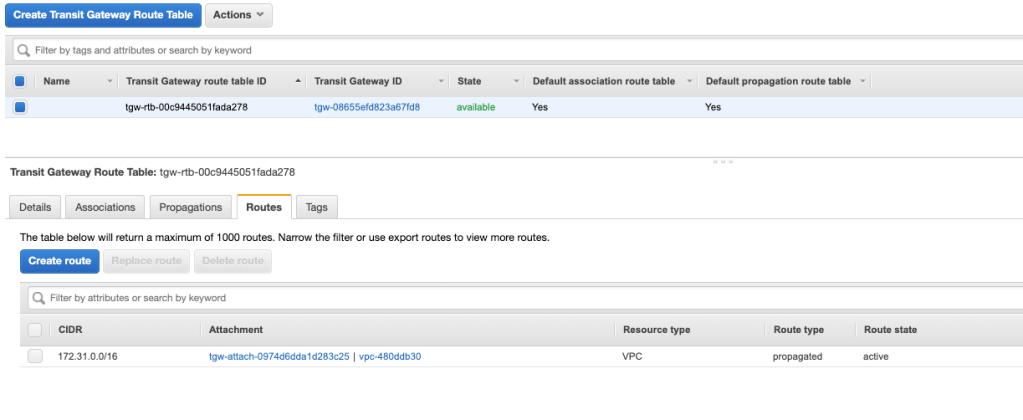
2- Create the VPC Attachment
In the images below, you can see I have created the VPC attachment to the TGW for my native AWS VPC. Once the attachment is complete, the Transit Gateway Route Table immediately populates with the networks from the attached VPC.

3- Create the VPN Attachment for the Transit Gateway
As you may already know, today only a VPN attachment is supported from VMC on AWS to a Transit Gateway. In the images below, you can see the VPN has been created, and the Transit Gateway Route Table has automatically updated to include the SDDC networks.

TGW VPN Attachment 
TGW VPN Attachment Details – 1 
TGW VPN Attachment Details – 2 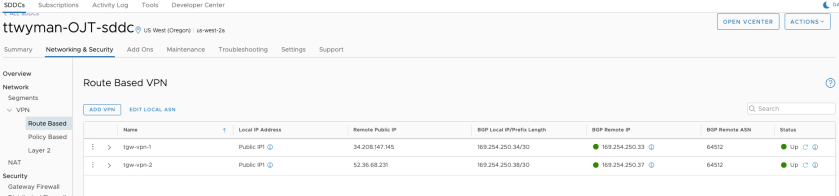
SDDC VPN 
Updated Transit Gateway Route Table
4- Inject the Default Route
This is the most important part of the exercise – we have to inject the default route into the Transit Gateway Route Table to be sure other entities (like our SDDC) receive the propagated route from the TGW.
Simply navigate to the TGW Route table, go to the “Routes” tab, and click Create Route. Enter a network of “0.0.0.0/0” and select the Transit Gateway attachment for the native AWS VPC – in our example it is the attachment labeled with “VPC” rather than “VPN.” The image below shows the end result of the Transit Gateway Route Table.

5- Verify Your Changes
Once the default route has been successfully injected into the Transit Gateway Route Table, it will automatically propagate to your SDDC. We can confirm this in the UI, as well as through PowerCLI.

SDDC VPN – Show Routes 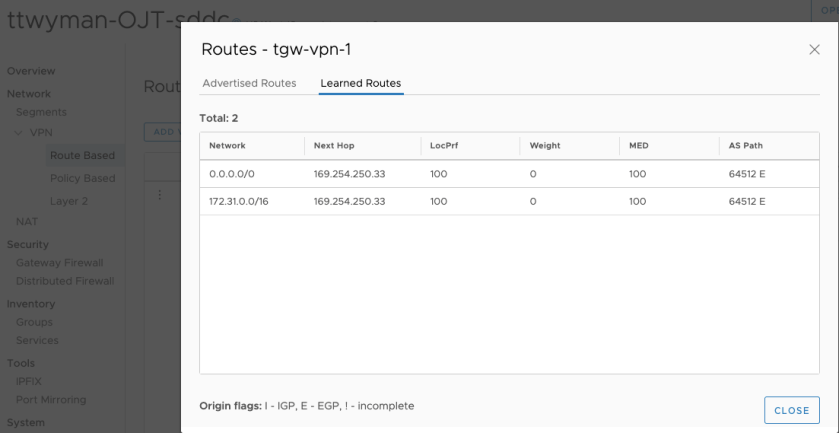
SDDC VPN – Learned Routes 
PowerCLI – SDDC Route Table 
PowerCLI – SDDC Routes, BGP Only
That’s all there is to it – you can clearly see the default route is directed to the BGP addresses for the VPN, leading to the Transit Gateway.

thank you very much for sharing!
Quick question: on TGW the next-hop is the security VPC attachment. When traffic is from a VM in SDDC to the Internet, how the traffic can be sent to the firewall in the attached AWS Security VPC?
Great question, David. It is true that this is a bit more complex than I am alluding to here. You would deploy the firewall in the Security VPC, and configure the route tables for the Security VPC to point the default route to the internal NIC of the firewall. You can find a detailed overview of exactly how to do this for Palo Alto here – https://docs.paloaltonetworks.com/vm-series/7-1/vm-series-deployment/set-up-the-vm-series-firewall-in-aws.html.
I plan to review the setup we used for my customer in a future article.