
Truly achieving infrastructure-as-code (IaaC) means not only writing your infrastructure, as code, but also versioning it, and ensuring it is fully integrated into your GitOps workflows. Buckle in – this is a long one!
Overview
One of the greatest strengths of VMware Salt is the ability to define and enforce the total state of an environment through the use of state files – human-readable, text-based files in YAML format containing all the necessary information to ensure a system is deployed and configured correctly. These state files may be version-controlled and stored in a version control system (VCS), such as a git repository, Github, bitbucket, et cetera. VMware Salt, therefore, lends itself well to deploying and managing your infrastructure as code. There are two possible ways to integrate VMware Salt with a VCS – either by configuring the VCF directly as a GitFS filesystem, or by leveraging a VCS externally through selective repository orchestration. This paper will focus on the latter use case.
Note there are Github repositories that accompany this post:
Table of Contents
- Overview
- Table of Contents
- Configuring Salt master and git orchestration
- Create SSH keys for GitHub Deploy keys
- Create state and pillar files to configure git on salt master
- Create state file to clone /update repositories locally
- Configure salt master file system
- Perform initial git installation and synchronization
- Adjust File root and Pillar root
- Ensuring repository update before jobs
- Refreshing Local Repositories Automatically
- Automatic Pulls via Webhooks & Salt Reactor (GitOps)
GitFS
It is possible to have the salt master pull state and pillar data directly from such a master repository. In this case one would configure the salt master to leverage a git-based filesystem (“gitfs”) via a python module, such as pygit2 or gitpython. Using this configuration, repositories are not cloned locally, but rather Salt masters pull configurations and states directly from a git repository at the time of execution, ensuring the latest configuration data and state information is used for the job. For a thorough overview, please see documentation for GitFS walkthrough.
However, in large environments with many repositories, and/or many branches for each of those repositories, using GitFS directly as the source of state and configuration data can become problematic as every job is pulled directly from the repository at execution. With many repositories and branches (referred to as “Environments” in Salt), this can generate a great deal of network traffic and extra processing time as the Salt Master parses through all the pulled information to find the correct state or job to run, potentially becoming a bottleneck.
Master / Git Orchestration
As an alternative to using GitFS to pull directly from a version control system during execution, it is possible to deploy a git client directly on the master, and clone the necessary repositories locally. This ensures configuration and state data is retrieved locally during jobs rather than over the network, ensuring immediate execution of the necessary changes. Of course it may still be necessary to pull the latest changes first, in which case one may orchestrate pulling the latest for that specific Environment/repository and yet still avoid the complexities, network traffic, and potential bottleneck of leveraging a large GitFS implementation. The remainder of this paper will focus on this use case.
Configuring Salt master and git orchestration
The following high-level steps outline the process for configuring git locally on your salt master(s) in a master / git orchestration scenario.
- Create SSH keys for GitHub Deploy keys / Bitbucket Access keys
- Create state and pillar files to configure git on salt master
- Create state file to clone / update repositories locally
- Configure salt master file system (leverage local repos as source for salt states / pillars)
- Perform initial git installation and synchronization
- Adjust the salt master file and pillar root configuration
- Ensure repository updates before jobs
The following sections will provide a guide for completing the above steps.
Create SSH keys for GitHub Deploy keys
Since we are using git to pull repositories for running configuration jobs on our minions, we must first ensure ssh and git are installed and configured correctly on our salt master.
Create SSH Keys
Generate an SSH keypair on your Salt Master – do this once for each repository (state and pillar) – you will be prompted for a password… this has been left out of the below example:
ssh-keygen -t ed25519 -f /root/.ssh/id_github_deployssh-keygen -t ed25519 -f /root/.ssh/id_github_pillar_deploy
Note: you may need to create keys for both pillar and state repositories depending on your environment.
See the relevant sections on Github or Atlassian Bitbucket for creating ssh keys for use with your project(s).
Add Keys to Repositories on Github
Using your browser, navigate to GitHub.com, go to the state repository and navigate to Repository Settings –>Deploy Keys.
Click Add Key and paste your public key (e.g. /root/.ssh/id_github_deploy.pub).
Repeat for your pillar repository.
See relevant documentation section(s) on Atlassian for instructions for Bitbucket repositories.
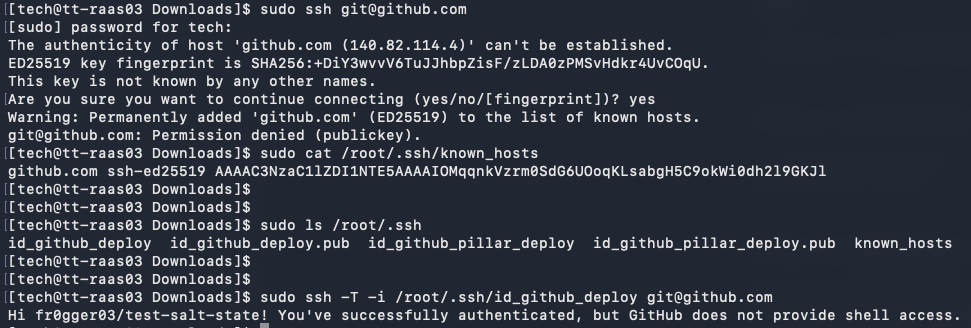
Verify Keys
Verify your key is working with Github – you should see something similar to the following:
Create state and pillar files to configure git on salt master
One may install and configure git manually on the salt master(s). We will leverage state and pillar files to do the following:
- Store git configuration and credential details for your user / tokens
- Install and configure git
- Clone the state and pillar repositories locally to the salt master.
Configure pillar data for git
Create the following as master_git_config.sls in your pillar repository.
git_master: # Global Git configuration settings config: user.name: "Salt Master Automation" user.email: "your_email@example.com" init.defaultBranch: "main" # State Repository Details state_repo: url: "git@github.com:your-github-username/your-state-repo.git" target: "/srv/salt/state-repo" branch: "main" key_path: "/root/.ssh/id_github_deploy" private_key: | -----BEGIN OPENSSH PRIVATE KEY----- ... PASTE YOUR ED25519 STATE DEPLOY PRIVATE KEY HERE ... -----END OPENSSH PRIVATE KEY----- # Pillar Repository Details pillar_repo: url: "git@github.com:your-github-username/your-pillar-repo.git" target: "/srv/salt/pillar-repo" branch: "main" key_path: "/root/.ssh/id_github_pillar_deploy" private_key: | -----BEGIN OPENSSH PRIVATE KEY----- ... PASTE YOUR ED25519 PILLAR DEPLOY PRIVATE KEY HERE ... -----END OPENSSH PRIVATE KEY-----
Note: be sure to replace username, email, branch (etc) to match your requirements
Create pillar top file
Create a top file to assign the above pillar configuration data to your salt master:
# pillar top.slsbase: 'saltmaster': - master_git_config
Define git installation logic in state
In your state repository, create the following as master_git_install.sls
# 1. Install Gitinstall_git_pkg: pkg.installed: - name: git# 2. Configure Git directly using git.config_set reading Pillar keys{% for key, val in salt['pillar.get']('git_master:config', {}).items() %}configure_git_{{ key }}: git.config_set: - name: {{ key }} - value: {{ val }} - global: True - user: root - require: - pkg: install_git_pkg{% endfor %}# 3. Add github.com to known_hosts to prevent host key verification promptsgithub_known_host: ssh_known_hosts.present: - name: github.com - user: root - hash_known_hosts: False# 4. Deploy State Repo SSH Keydeploy_state_repo_key: file.managed: - name: {{ salt['pillar.get']('git_master:state_repo:key_path') }} - contents_pillar: git_master:state_repo:private_key - user: root - group: root - mode: '0600' - makedirs: True# 5. Deploy Pillar Repo SSH Keydeploy_pillar_repo_key: file.managed: - name: {{ salt['pillar.get']('git_master:pillar_repo:key_path') }} - contents_pillar: git_master:pillar_repo:private_key - user: root - group: root - mode: '0600' - makedirs: True
Create state file to clone /update repositories locally
If you are actually setting the pillar and state data in a software repository initially, then before you can actually run a state.apply, you will need the salt master to be able to clone the repositories locally.
Note: this will be used in automation later – we will perform an initial pull shortly.
In your state repository, create the following as master_git_sync.sls
# Pull / Sync State Repositorysync_state_repo: git.latest: - name: {{ salt['pillar.get']('git_master:state_repo:url') }} - target: {{ salt['pillar.get']('git_master:state_repo:target') }} - rev: {{ salt['pillar.get']('git_master:state_repo:branch') }} - identity: {{ salt['pillar.get']('git_master:state_repo:key_path') }} - force_fetch: True - force_checkout: True - force_reset: True - require: - pkg: install_git_pkg - ssh_known_hosts: github_known_host - file: deploy_state_repo_key# Pull / Sync Pillar Repositorysync_pillar_repo: git.latest: - name: {{ salt['pillar.get']('git_master:pillar_repo:url') }} - target: {{ salt['pillar.get']('git_master:pillar_repo:target') }} - rev: {{ salt['pillar.get']('git_master:pillar_repo:branch') }} - identity: {{ salt['pillar.get']('git_master:pillar_repo:key_path') }} - force_fetch: True - force_checkout: True - force_reset: True - require: - pkg: install_git_pkg - ssh_known_hosts: github_known_host - file: deploy_pillar_repo_key
Configure salt master file system
Once the repositories are cloned to the salt master, the salt master must be configured to use those directories as the source for its file system. To map those specific directories to your base environment, you need to configure the file_roots and pillar_roots options on your Salt Master.
You can define these in separate configuration files under /etc/salt/master.d/ or directly within the main /etc/salt/master configuration file:
Create state and pillar filesystem configuration files.
Save this file in your state repository as file_roots.conf
(be sure to replace with a name of your choosing to represent your state repository)
# file_roots.conffile_roots: base: - /srv/salt/repos/test-salt-state
Save the following file in your state repository as pillar_roots.conf
(be sure to replace with a name of your choosing to represent your pillar repository)
# pillar_roots.confpillar_roots: base: - /srv/salt/repos/test-salt-pillar
Create state file to manage filesystem config
Save the following as fileroot_config.sls
# fileroot_config.slsmanage_fileroot_config: file.managed: - name: /etc/salt/master.d/file_roots.conf - source: salt://git_master/file_roots.conf - user: root - group: root - mode: '0644'manage_pillarroot_config: file.managed: - name: /etc/salt/master.d/pillar_roots.conf - source: salt://git_master/pillar_roots.conf - user: root - group: root - mode: '0644'
Configure state top file
Create a top file to assign the above configuration state to your salt master:
# state top.slsbase: 'saltmaster': - git_master.fileroot_config - git_master.master_git_install - git_master.master_git_sync
Don’t forget to commit and push your changes.
Perform initial git installation and synchronization
Since we can’t actually use git to pull repository data until git is actually installed, we must run a one-time installation and configuration on the salt master. Create the following configuration in the RAAS File Server – using the Base environment, save as /git/clone.sls:
# clone.slsinstall_git: pkg.installed: - name: gitensure_repos_directory_exists: file.directory: - name: /srv/repos - user: root - group: root - mode: 755 - makedirs: Trueensure_root_ssh_dir: file.directory: - name: /root/.ssh - user: root - group: root - mode: '0700'# Creates an empty /root/.ssh/config ONLY if it doesn't already existensure_ssh_config_exists: file.managed: - name: /root/.ssh/config - user: root - group: root - mode: '0600' - replace: False - require: - file: ensure_root_ssh_dir# Safely inserts or updates the managed block inside the config# this creates aliases for your state and pillar repos# and ensures use of previously created SSH keysmanage_github_ssh_aliases: file.blockreplace: - name: /root/.ssh/config - marker_start: "# BEGIN Salt Managed GitHub Keys" - marker_end: "# END Salt Managed GitHub Keys" - append_if_not_found: True - content: | Host github-test-salt-state HostName github.com User git IdentityFile /root/.ssh/id_github_deploy IdentitiesOnly yes Host github-test-salt-pillar HostName github.com User git IdentityFile /root/.ssh/id_github_pillar_deploy IdentitiesOnly yes - require: - file: ensure_ssh_config_existsclone_salt_repo: git.latest: - name: git@github-test-salt-state:<PATH TO YOUR REPO HERE - e.g. user/test-salt-state.git> - target: /srv/repos/test-salt-state - branch: main - require: - pkg: install_git - file: ensure_repos_directory_exists - file: manage_github_ssh_aliasesclone_pillar_repo: git.latest: - name: git@github-test-salt-pillar:<PATH TO YOUR REPO HERE - e.g. user/test-salt-pillar.git> - target: /srv/repos/test-salt-pillar - branch: main - require: - pkg: install_git - file: ensure_repos_directory_exists - file: manage_github_ssh_aliases
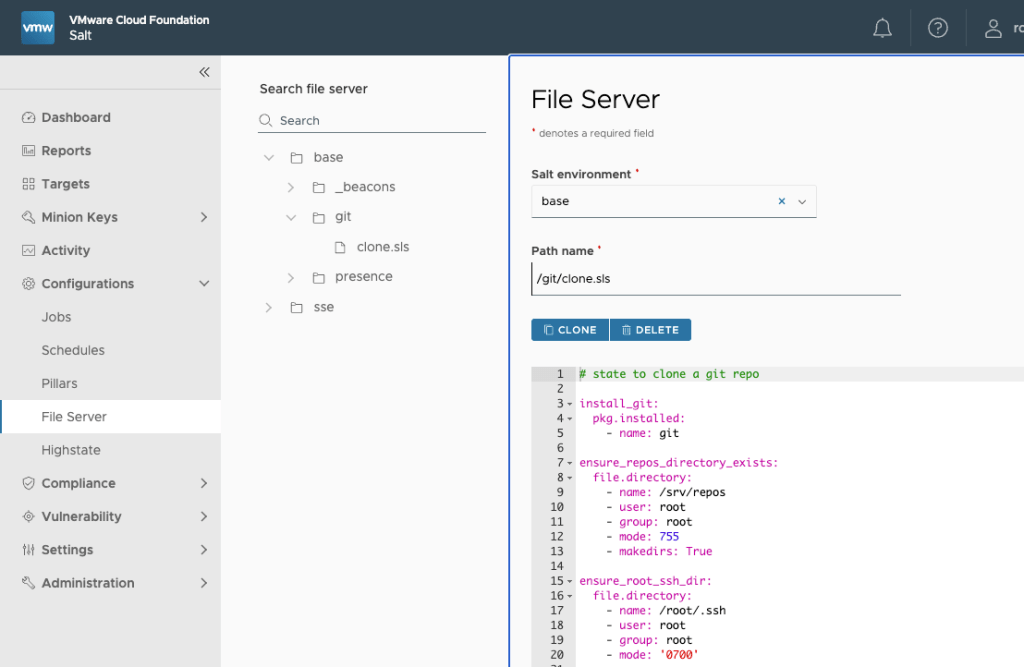
Image: Example configuration in RAAS file server for initial git install / sync
Create a job and run the above against your salt master – this should install and configure git, and clone the repos locally.
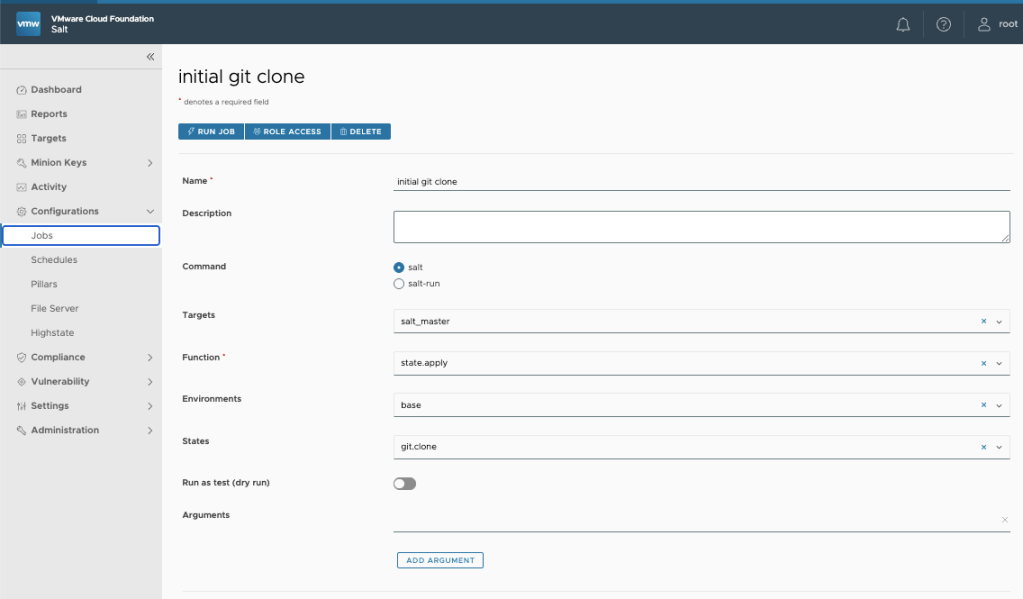
Image: Example job configuration in RAAS file server for initial git install / sync
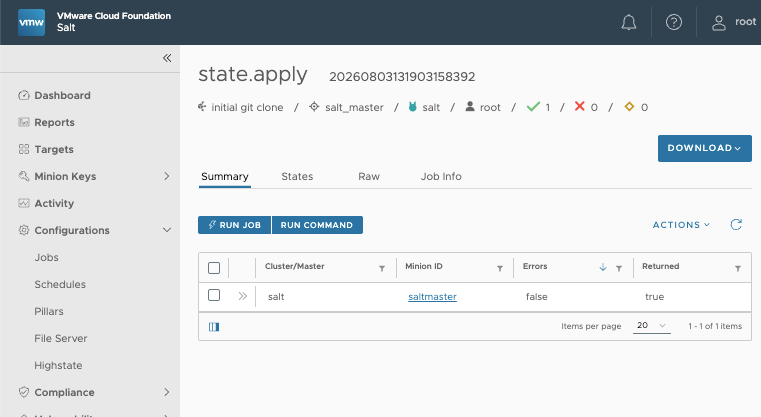
Image: Activity results for initial git install / sync
Though this is intended for one-time use, you may run the job again at any time to force an update to the local repositories before production.
Adjust File root and Pillar root
This is a one-time task – now that the repos are local, you must move the configuration files into place and restart the salt master service to ensure it is using the new repos as its file system:
sudo cp /srv/repos/test-salt-state/<PATH TO file_roots.conf> /etc/salt/master.d/sudo cp /srv/repos/test-salt-state/<PATH TO pillar_roots.conf> /etc/salt/master.d/sudo chown root:root /etc/salt/master.d/*.confsudo chmod 644 /etc/salt/master.d/*.confsudo systemctl restart salt-master
Note: be sure to remove any references to “file_roots” or “pillar_roots” in any other configuration files – or combine them – or the above may not take effect.
Confirm the salt master has adjusted where to look for its file / pillar roots:
sudo salt-run config.get file_rootsbase: - /srv/repos/test-salt-statesudo salt-run config.get pillar_rootsbase: - /srv/repos/test-salt-pillarsudo salt-run fileserver.file_list saltenv=base- git/clone.sls- git_master/file_roots.conf- git_master/master_git_install.sls- git_master/master_git_sync.sls- git_master/pillar_roots.conf
(** you should see the contents of your repository **)
Run a test job
You should now be able to run jobs against your environment using states defined in your repository. Let’s start by running a test on the highstate for the salt master:
salt 'saltmaster' state.highstate test=True
Observe the results. You will should see something similar to the following:
sudo salt 'saltmaster' state.highstate test=True[sudo] password for tech:saltmaster:---------- ID: manage_fileroot_config Function: file.managed Name: /etc/salt/master.d/file_roots.conf Result: True Comment: The file /etc/salt/master.d/file_roots.conf is in the correct state Started: 09:20:08.131468 Duration: 28.952 ms Changes: ---------- ID: manage_pillarroot_config Function: file.managed Name: /etc/salt/master.d/pillar_roots.conf Result: True Comment: The file /etc/salt/master.d/pillar_roots.conf is in the correct state Started: 09:20:08.160555 Duration: 25.492 ms Changes: ---------- ID: install_git_pkg Function: pkg.installed Name: git Result: True Comment: All specified packages are already installed Started: 09:20:08.213841 Duration: 307.921 ms Changes: ---------- ID: configure_git_user.name Function: git.config_set Name: user.name Result: None Comment: Global key 'user.name' would be added as 'Salt Master Automation' Started: 09:20:08.528878 Duration: 526.485 ms Changes: ---------- new: - Salt Master Automation old: None---------- ID: configure_git_user.email Function: git.config_set Name: user.email Result: None Comment: Global key 'user.email' would be added as 'YOUR EMAIL HERE' Started: 09:20:09.055725 Duration: 234.087 ms Changes: ---------- new: - YOUR EMAIL HERE old: None---------- ID: configure_git_init.defaultBranch Function: git.config_set Name: init.defaultBranch Result: None Comment: Global key 'init.defaultBranch' would be added as 'main' Started: 09:20:09.290092 Duration: 232.222 ms Changes: ---------- new: - main old: None---------- ID: github_known_host Function: ssh_known_hosts.present Name: github.com Result: True Comment: Host github.com is already in .ssh/known_hosts Started: 09:20:09.525252 Duration: 15.004 ms Changes: ---------- ID: deploy_state_repo_key Function: file.managed Name: /root/.ssh/id_github_deploy Result: True Comment: The file /root/.ssh/id_github_deploy is in the correct state Started: 09:20:09.540347 Duration: 1.611 ms Changes: ---------- ID: deploy_pillar_repo_key Function: file.managed Name: /root/.ssh/id_github_pillar_deploy Result: True Comment: The file /root/.ssh/id_github_pillar_deploy is in the correct state Started: 09:20:09.542036 Duration: 1.208 ms Changes: ---------- ID: sync_state_repo Function: git.latest Name: git@github-test-salt-state:YOUR ORG/YOUR STATE REPO HERE Result: True Comment: Repository /srv/repos/test-salt-state is up-to-date Started: 09:20:09.543379 Duration: 396.045 ms Changes: ---------- ID: sync_pillar_repo Function: git.latest Name: git@github-test-salt-pillar:YOUR ORG/YOUR STATE REPO HERE Result: True Comment: Repository /srv/repos/test-salt-pillar is up-to-date Started: 09:20:09.939667 Duration: 388.81 ms Changes: Summary for saltmaster------------Succeeded: 11 (unchanged=3, changed=3)Failed: 0------------Total states run: 11Total run time: 2.158 s
This is expected – it shows what will be changed on the next actual highstate run.
Go ahead and apply the highstate:
salt 'saltmaster' state.highstate
Ensuring repository update before jobs
At this point, you may choose to stop – the salt master has been configured with git, and is looking to use the local copies of the state and pillar repositories for its source data. However, because Salt state files and pillar templates are read directly from the Master’s local filesystem at execution time, running a job against minions with outdated code on the master will execute old logic.
You may refresh / pull the latest copies of the repositories at any time either by running a highstate on the salt master, or by running the job you configured on the RAAS server earlier (see Perform initial git installation and synchronization, above).
Any one of the following should refresh your local repositories before a job:
sudo salt 'saltmaster' state.highstatesudo salt-call state.apply git_master_syncsudo salt ‘saltmaster’ state.appy git_master_sync
… or of course you can use your RAAS server and run your “Initial git sync” job.
In all four cases –
- No manual git clone is required.
- When git.latest evaluates target paths like /srv/salt/state-repo:
- If the directory is empty or missing, Salt runs an initial git clone using your deploy key.
- If the directory already exists, Salt fetches the latest refs, checks out your specified branch (main), and hard-resets local changes to match the remote branch.
Refreshing Local Repositories Automatically
Overview
There are three main patterns to ensure your Master’s local repos are always fresh before applying configurations:
Pattern A: Salt Orchestration (Recommended for Manual/Scheduled Deployment)
Instead of executing salt ‘*’ state.apply directly, run an Orchestration Runner. Orchestration enforces a strict sequence: sync code on the master first, refresh the master’s pillar cache, and then run states on your minions.
Create /srv/salt/orch/deploy.sls:
# Step 1: Force master to pull latest State & Pillar code from GitHubsync_master_git_repos: salt.state: - tgt: 'salt-master*' # Your master minion ID - sls: - git_master_sync# Step 2: Clear memory caches so master reads new pillar/state data immediatelyrefresh_pillar_data: salt.function: - name: saltutil.refresh_pillar - tgt: '*' - require: - salt: sync_master_git_repos# Step 3: Run state application / highstate across target minionsapply_states_to_minions: salt.state: - tgt: '*' - highstate: True - require: - salt: refresh_pillar_data
To run your jobs safely:
salt-run state.orchestrate orch.deploy
Pattern B: Automatic Pulls via GitHub Webhooks & Salt Reactor (GitOps)
If you want true event-driven automation:
- Enable the salt-api daemon on your Master.
- Configure a Webhook in GitHub on push events to hit your Salt Master’s API.
- Use the Salt Reactor System to catch the webhook event and immediately trigger the git_master_sync state.
Every time you merge or push code to GitHub, your master automatically pulls the updates within seconds, keeping the local filesystem perpetually up to date without human intervention.
Pattern C: Scheduled Job
Schedule a cron job on the salt master
For a low-overhead background sync, create a system cron job or systemd timer on the Master host that runs every 5 to 15 minutes:
*/10 * * * * root salt-call state.apply git_master_sync >/dev/null 2>&1
Schedule a job on the RAAS
Alternatively, create a scheduled job on the RAAS server to periodically run your initial git synchronization job (created earlier).
The remainder of this guide will review Pattern B: Automatic Pulls via GitHub Webhooks & Salt Reactor (GitOps).
Automatic Pulls via Webhooks & Salt Reactor (GitOps)
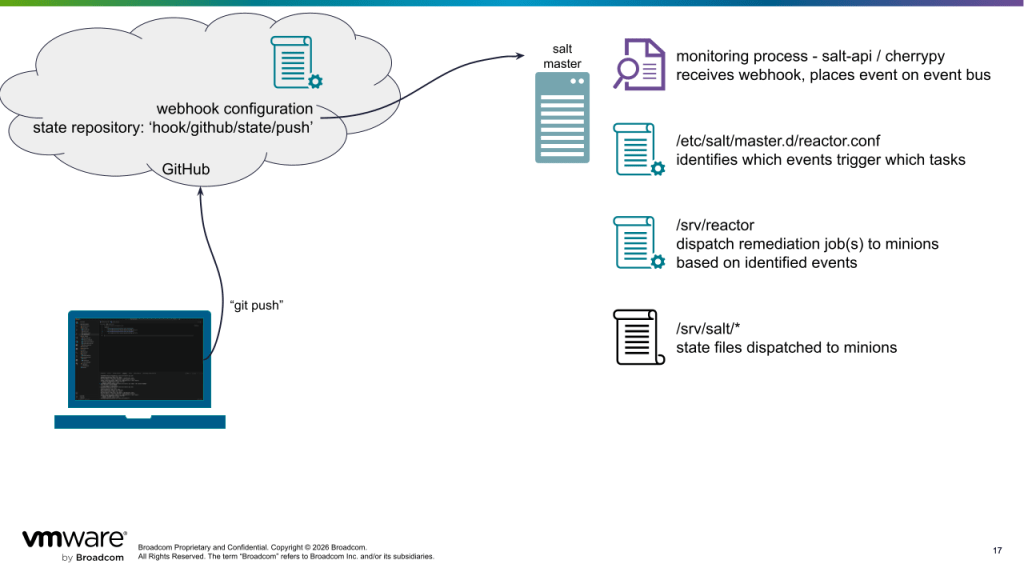
To automatically pull updates for your state and pillar repositories, there are several additional steps needed… This guide offers one path with Github webhooks – certainly there are many additional options. Technically, all that needs to happen is to get an event of some kind onto the event bus (i.e. “salt-call event.send some/kind/of/event”) that triggers a git pull of some kind. Salt uses a ‘reactor’ system to ‘listen’ for such events and take action. VMware Salt ships with an API service (salt-api) that makes this relatively simple for us.
To configure automatic updates:
- Configure salt-api as the ‘listener’ service
- Configure webhooks for your state and pillar repositories
- Configure job state file to fetch git updates
- Configure reactor trigger system
Configure salt-api listener service
The salt-api service must bind to a client interface to provide the ability to execute functions from execution, runner, and wheel modules. For our purposes, we will use the netapi module to bind to the “local” client interface, which provides the ability to run execution modules on minions. Furthermore, we will use the rest_cherrypy python module and create a web server, providing a simple REST API endpoint.
Install the salt-api module on the salt master (follow the instructions for your platform):
sudo dnf install salt-api
Confirm rest_cherrypy is installed on the same host:
sudo salt-pip install cherrypy
(this should ensure it matches your system Python version used by Salt)
Create the necessary configuration file:
# /etc/salt/master.d/netclient.conf # netapi_clients enable one or more listeners for salt-api# we only need 'local' to allow master/minion communicationnetapi_enable_clients: - local# 8000 is default for cherrypy - adjust as necessaryrest_cherrypy: port: 8000 disable_ssl: True webhook_disable_auth: True
Note that for this example I have disabled the requirement for SSL certificates, as well as webhook authentication.
Restart salt-master and start / enable salt-api:
sudo systemctl restart salt-mastersudo systemctl enable salt-apisudo systemctl start salt-api
Configure a Webhook for each repository
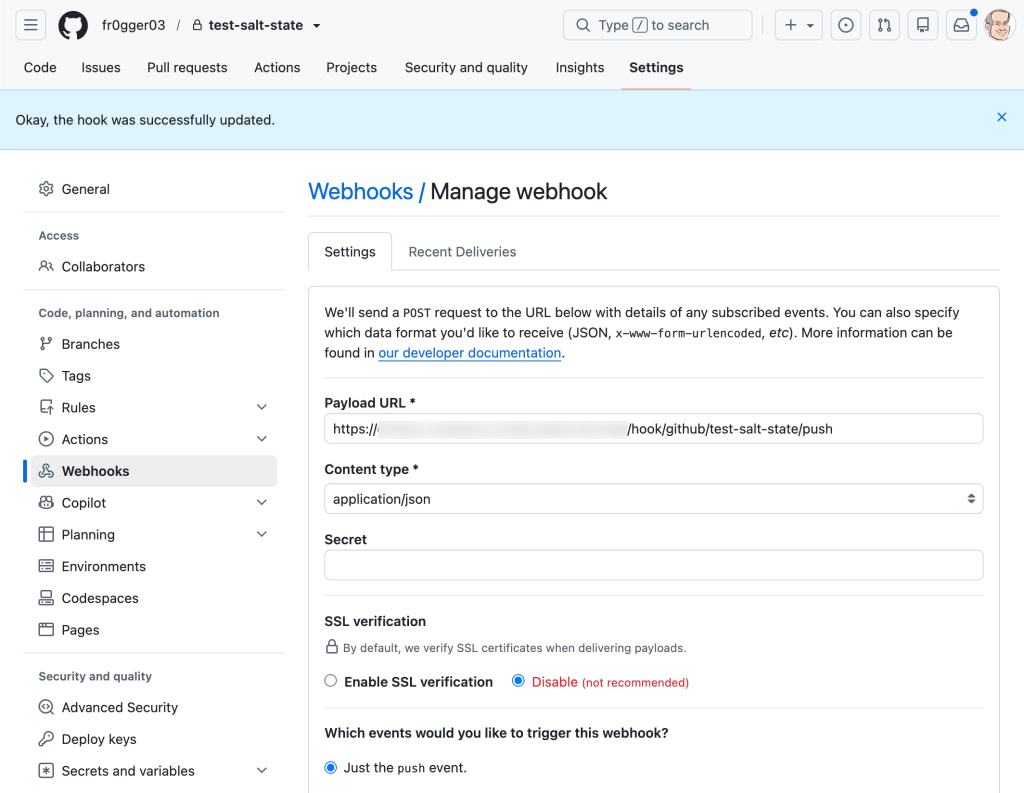
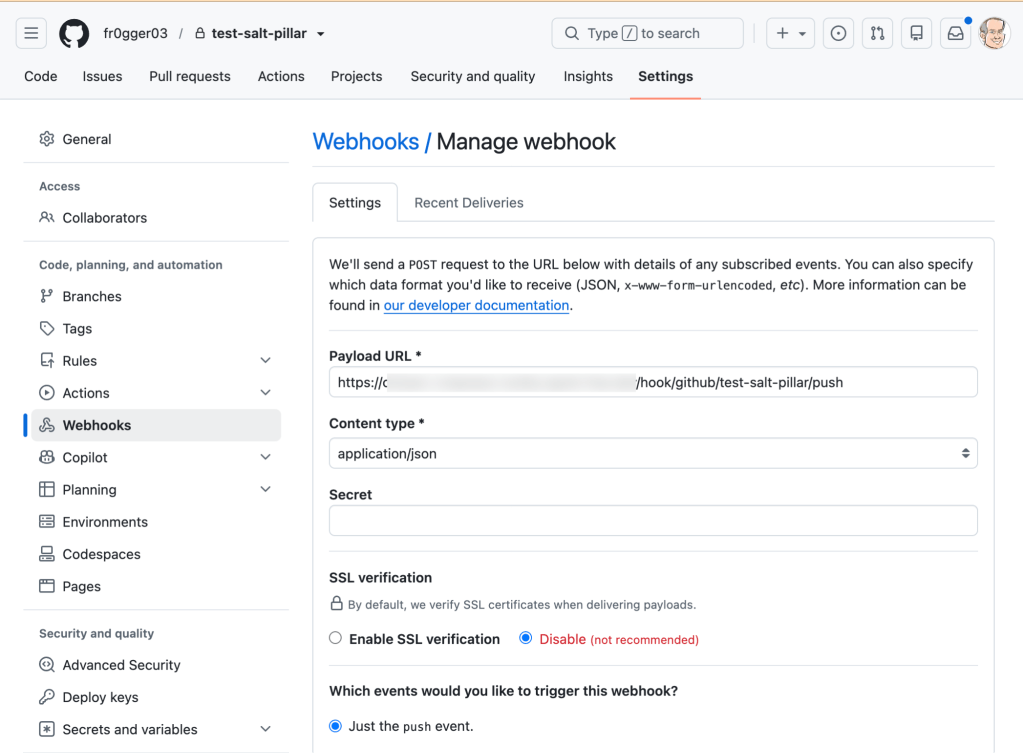
Follow the instructions for your version control system for creating a webhook, and target your server hosting the salt-api service, with the port configured in the above file. Note that I have configured the following webhooks in GitHub:
- State repository: “/hook/github/test-salt-state/push”
- Pillar repository: “/hook/github/test-salt-pillar/push”
Configure job state file to fetch git updates
If you have followed this guide, then the necessary state file to actually perform the git pull was created earlier. However, we need to create a ‘job’ file that will call that state when triggered.
Using the directory structure(s) we are following in this guide, create the following file:
# /srv/repos/test-salt-state/reactors/github_pull.slssync_app_code: local.state.apply: - tgt: 'saltmaster' - arg: - git_master.master_git_sync
This file calls the minion service on the target (“tgt: ‘saltmaster’) to run the state.apply git_master.master_sync… it is functionally equivalent to “sudo salt ‘saltmaster’ state.apply git_master.master_sync”
Configure reactor trigger system
Finally, configure the salt master to listen for the events ‘caught’ by the salt-api listener by creating a reactor configuration file that ties the event to the job file. Note: even though the webhooks were configured on Github as:
- State repository: “/hook/github/test-salt-state/push”
- Pillar repository: “/hook/github/test-salt-pillar/push”
They will be placed on the event bus as:
- State repository: “salt/netapi/hook/github/test-salt-state/push”
- Pillar repository: “salt/netapi/hook/github/test-salt-pillar/push”
Since this is a configuration file that affects the configuration of the salt-master service, we place it in the /etc/salt/master.d/ directory and restart the service:
# /etc/salt/master.d/reactor.confreactor: - 'salt/netapi/hook/github/test-salt-state/push': - /srv/repos/test-salt-state/reactors/github_pull.sls - 'salt/netapi/hook/github/test-salt-pillar/push': - /srv/repos/test-salt-state/reactors/github_pull.sls
Restart the service:
sudo systemctl restart salt-master
Watch events on the event bus
You can watch events on the event bus using the following command from the salt master:
salt-run state.event pretty=True
If everything is configured correctly, you should see events come in from the web hook:
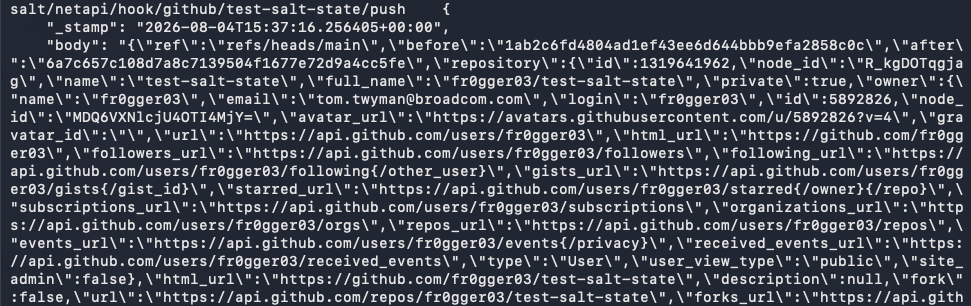
Event: github webhook placed on event bus
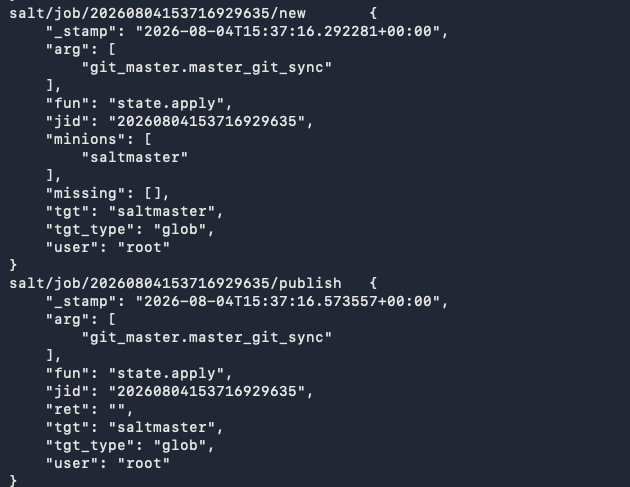
New job to sync repositories published

Job return (results) from state.apply on salt master
Congratulations! You can now perform a ‘git push’ from a laptop / workstation where you are building your infrastructure as code, and the salt master will receive a webhook, and automatically pull the latest locally.

