This is the fourth in a series of posts focusing on extending and enhancing the previously ‘Dockerized’ WordPress installation – specifically focused on the movement / migration of data for the newly containerized application.
- Part 1: How do I move data into a container- Part 1: the Use Case
- Part 2: How do I move data into a container- Part 2: the Setup
- Part 3: How do I move data into a container- Part 3: Using a ‘data mover container’
- Part 4: How do I move data into a container- Part 4: Using a multi-stage build (you are here)
As I mentioned in my previous post, the idea here is straightforward… We have data in one of two folders for each of our containers (MySQL and WordPress) that needs to be moved or copied into a location accessible by the container at runtime. As specified previously, we need to be able to move / copy the “wp-content” folder into an accessible location for WordPress to use (previous post), and we need to move/copy the SQL backup file for the database for MySQL to import (previous post)… AND we need to be able to make a run-time decision on whether we are doing so with either the ‘test’ data or the ‘production’ data.
In Part 3 I used a ‘data mover’ container to copy the data into the deployed containers, using environment variables and a script in the data mover to make the decision(s) about which data set to copy. In this post, I will instead use a multi-stage build with Docker files and Compose to accomplish the same task. I actually think this method is a bit cleaner and more elegant, as it leverages functionality built right into the Docker portfolio – that said this same elegance may limit its use in production scenarios… you can’t necessarily use Docker compose files for K8S, for example.
Here is the plan:
- Just as in my previous example using a datamover, I need to set the ‘test’ or ‘prod’ environment variables:
- I will be using compose to spin up the environment
- I will use a ‘.env file’ during compose execution to deliver environment variables
- the ‘.env’ file(s) will set name of the target volume to receive the data
- I will add a new variable in to indicate the ‘target’ environment (‘test’ or ‘prod’)
- I will have separate .env files for either ‘test’ or ‘prod’
Here are the two .env files I created – I named them “env.stage.prod” and “env.stage.test”:
cat env.stage.prod

TARGET_ENV = prod
DB_DATA_VOLUME = db_data_prod
WPCONTENT_VOLUME = wp_content_prod
cat env.stage.test
TARGET_ENV = test
DB_DATA_VOLUME = db_data_test
WPCONTENT_VOLUME = wp_content_testYou will note that i have used separate volume names for ‘test’ and ‘prod’ – this is to ensure there is no confusion and no chance of overwriting test data with prod, or vice versa.
Now, to actually copy / move the files, I will use stages built into Dockerfiles for WordPress and MySQL.
Here is the Dockerfile for WordPress:
from wordpress:6.4.3-php8.2-apache as base
COPY ./uploads.ini /usr/local/etc/php/conf.d/uploads.ini

from base as test
COPY ./test/wp-content /var/www/html/wp-content
VOLUME [ "/var/www/html/wp-content" ]

from base as prod
COPY ./prod/wp-content /var/www/html/wp-content
VOLUME [ "/var/www/html/wp-content" ]
I’m keeping it simple for this exercise, though there is plenty more I could add in if I chose. Essentially this Dockerfile performs the following on build:
- pulls the “wordpress:6.4.3-php8.2-apache” image
- copies a file (uploads.ini) into the image – this simply allows me to override the built-in 2MB upload limit on WordPress
- Then, depending on whether I intend to deploy to ‘test’ or ‘prod,’ the build will:
- copy my files for the WordPress ‘wp-content’ folder from either the ‘test’ location or the ‘prod’ location.
- expose the contents of the container’s wp-content directory as a new volume.
Here is the Dockerfile for MySQL:
from mysql:8.3.0 as base

from base as test
COPY ./test/mysql-init-files/testwordpress.sql /docker-entrypoint-initdb.d/
VOLUME [ "/var/lib/mysql" ]

from base as prod
COPY ./prod/mysql-init-files/prodwordpress.sql /docker-entrypoint-initdb.d/
VOLUME [ "/var/lib/mysql" ]
Similar to the WordPress Dockerfile above, this one performs the following:
- pulls the “mysql:8.3.0” image
- Then, depending on whether I intend to deploy to ‘test’ or ‘prod,’ the build will:
- copies the correct SQL backup file (test or prod) into the image
- as I have pointed out previously, Docker has a nifty feature to have the database read in / play back any SQL script files found in the ‘docker-entrypoint-initdb.d’ directory… this works for several solutions, including Postgres, MySQL, Mongo, etc…
- see “Initialization scripts” in the docs for the Official Docker Postgres image
- expose the contents of the container’s database directory as a new volume.
- copies the correct SQL backup file (test or prod) into the image
Lastly, I need a compose file to tie it all together.
cat compose-stage.yml

version: "3.8"

services:

#   datamover:
#     image: thomastwyman557/wp-datamover:v1
#     restart: no
#     environment:
#       SOURCE_WP_DIR:
#       SOURCE_SQL_DIR:
#     volumes:
#       - wpcontent:/target-wp
#       - sqlinit:/target-sql

  db:
    image: thomastwyman557/wp-mysql:${TARGET_ENV}
    restart: always
    build:
      context: ./
      target: $TARGET_ENV
      dockerfile: ./dockerfile-mysql
    environment:
      MYSQL_DATABASE: wordpress
      MYSQL_USER: wordpress
      MYSQL_PASSWORD_FILE: /run/secrets/db_password
      MYSQL_ROOT_PASSWORD_FILE: /run/secrets/db_root_password
    # depends_on:
    #   - datamover
    volumes:
      - ${DB_DATA_VOLUME}:/var/lib/mysql
      # - sqlinit:/docker-entrypoint-initdb.d
    secrets:
      - db_password
      - db_root_password

  wordpress:
    image: thomastwyman557/wp:${TARGET_ENV}
    restart: always
    build:
      context: ./
      target: $TARGET_ENV
      dockerfile: ./dockerfile-wp
    ports:
      - 80:80
    environment:
      WORDPRESS_DB_HOST: db
      WORDPRESS_DB_USER: wordpress
      WORDPRESS_DB_NAME: wordpress
      WORDPRESS_DB_PASSWORD_FILE: /run/secrets/db_password
    volumes:
      - wordpress:/var/www/html
      - ${WPCONTENT_VOLUME}:/var/www/html/wp-content
      - ./uploads.ini:/usr/local/etc/php/conf.d/uploads.ini
    secrets:
      - db_password
    depends_on:
      # - datamover
      - db

secrets:
   db_password:
     file: ./run/secrets/db_password.txt
   db_root_password:
     file: ./run/secrets/db_root_password.txt

volumes:
  wordpress:
  wp_content_prod:
  wp_content_test:
  db_data_prod:
  db_data_test:
  # sqlinit:
You will notice that I have simply made a copy of the Compose file from the previous post, however I have commented out the sections that are not needed for this effort, and place the new sections / parameters in bold italics.
Notice I commented out entirely the section for the ‘data mover’ container, as it is not needed at all for this effort.
In the section for the MySQL server:
- you will notice I call out the required variables for MySQL server as per the documentation
- you may also notice I am using secrets to avoid exposing passwords in the compose file itself (in a production environment I might choose to use something like Hashicorp Vault for secrets management)
- I am using the “${TARGET_ENV}” variable in a couple places…
- Firstly, you will note I am actually using it in the tag for the resulting image. This is simply to remind me that it is best practice to appropriately tag images with versions, etc… in production I would add additional information here.
- Secondly I have added the following to the build section – target: $TARGET_ENV to specify which stage to use during the build process from the Dockerfile.
- I have added a line to use the new Dockerfile:
- dockerfile: ./dockerfile-mysql
- Finally, I am using another environment variable – gleaned from the .ENV file – to declare a volume for the database directory:
- ${DB_DATA_VOLUME}:/var/lib/mysql
In the section for WordPress:
- you will notice I call out the required variables for WordPress server as per the documentation
- you may also notice I am using secrets to avoid exposing passwords in the compose file itself (in a production environment I might choose to use something like Hashicorp Vault for secrets management)
- I am using the “depends_on” parameter to indicate WordPress shouldn’t start until the MySQL container starts
- Similar to the MySQL container, I am using $TARGET_ENV in a couple places:
- Firstly to add a tag to the resulting image from the build section
- Secondly to specify which stage to use from the Dockerfile in the build process.
- I have added a line to specify the Dockerfile to use during the build process:
- dockerfile: ./dockerfile-wp
- Finally, I am declaring a few volumes:
- wordpress:/var/www/html
- This maps a new volume “wordpress” to the container’s /var/www/html folder – this is the recommended volume to hold the WordPress installation outside the container so it will persist
- ${WPCONTENT_VOLUME}:/var/www/html/wp-content
- This maps the a volume declared in the .ENV file to the container’s ‘wp-content’ folder, which holds the updated test or prod data for my posts, images, etc.
- ./uploads.ini:/usr/local/etc/php/conf.d/uploads.ini
- This is a custom uploads.ini file that allows me to reconfigure WordPress’ default upload limit… by default WordPress has a limit of a 2MB upload, which is too small for my purposes.
- wordpress:/var/www/html
Lastly, the compose file instantiates the necessary secrets and volumes required by the containers… you will notice that in this case, I delare ALL the possible volumes that could be created through the use of the Dockerfiles and compose:
- wordpress – always created
- The following are set as an environment variable based on the .ENV file in use when the compose command is issued… note that these MUST be declared in the compose file, however they will only actually be instantiated if also declared in the relevant SERVICE section of the compose file… (i.e. in this case using the variable(s) declared by the .ENV file in use):
- wp_content_prod
- wp_content_test
- db_data_prod
- db_data_test
To test this all I should need to do is run a docker compose command, and use the correct compose file and env file… Let’s test it out!
docker compose -f compose-stage.yml --env-file env.stage.test up -dThis looks convoluted, but that’s my fault. This is essentially “docker compose up,” but I am using a custom-named compose file, a custom-named .env file, and I am specifying that a build should be run. Here are the results:
[+] Running 2/2
! db Warning 0.5s
! wordpress Warning 0.7s
[+] Building 1.4s (17/17) FINISHED docker:desktop-linux
=> [db internal] load build definition from dockerfile-mysql 0.0s
=> => transferring dockerfile: 317B 0.0s
=> [db internal] load metadata for docker.io/library/mysql:8.3.0 0.4s
=> [db auth] library/mysql:pull token for registry-1.docker.io 0.0s
=> [db internal] load .dockerignore 0.0s
=> => transferring context: 2B 0.0s
=> [db internal] load build context 0.0s
=> => transferring context: 1.40MB 0.0s
=> [db base 1/1] FROM docker.io/library/mysql:8.3.0@sha256:9d1c923e5f66a89607285ee2641f8a53430a1ccd5e4a62b35eb8a48b74b9ff48 0.0s
=> CACHED [db test 1/1] COPY ./test/mysql-init-files/testwordpress.sql /docker-entrypoint-initdb.d/ 0.0s
=> [db] exporting to image 0.0s
=> => exporting layers 0.0s
=> => writing image sha256:93b04edeca3d734090c5624af84bc44a7881dba82996a8add2834522eee88918 0.0s
=> => naming to docker.io/thomastwyman557/wp-mysql:test 0.0s
=> [wordpress internal] load build definition from dockerfile-wp 0.0s
=> => transferring dockerfile: 353B 0.0s
=> [wordpress internal] load metadata for docker.io/library/wordpress:6.4.3-php8.2-apache 0.6s
=> [wordpress auth] library/wordpress:pull token for registry-1.docker.io 0.0s
=> [wordpress internal] load .dockerignore 0.0s
=> => transferring context: 2B 0.0s
=> [wordpress base 1/2] FROM docker.io/library/wordpress:6.4.3-php8.2-apache@sha256:8ae66efb09a2cc4f1ce44414c52b0ce4198c1f8ed338a6f51910bc09cd7d8bbb 0.0s
=> => resolve docker.io/library/wordpress:6.4.3-php8.2-apache@sha256:8ae66efb09a2cc4f1ce44414c52b0ce4198c1f8ed338a6f51910bc09cd7d8bbb 0.0s
=> [wordpress internal] load build context 0.2s
=> => transferring context: 27.08MB 0.2s
=> CACHED [wordpress base 2/2] COPY ./uploads.ini /usr/local/etc/php/conf.d/uploads.ini 0.0s
=> CACHED [wordpress test 1/1] COPY ./test/wp-content /var/www/html/wp-content 0.0s
=> [wordpress] exporting to image 0.0s
=> => exporting layers 0.0s
=> => writing image sha256:5bcc28cb16418257399dfebf76a0e68c20b5b6e0efd290798ac17468736fe2de 0.0s
=> => naming to docker.io/thomastwyman557/wp:test 0.0s
[+] Running 2/6
⠦ Network wp-migrate-stage_default Created 0.6s
⠴ Volume "wp-migrate-stage_db_data_test" Created 0.5s
⠴ Volume "wp-migrate-stage_wordpress" Created 0.5s
⠴ Volume "wp-migrate-stage_wp_content_test" Created 0.5s
✔ Container wp-migrate-stage-db-1 Started 0.4s
✔ Container wp-migrate-stage-wordpress-1 Started 0.4sIf we look in Docker Desktop we see the following:
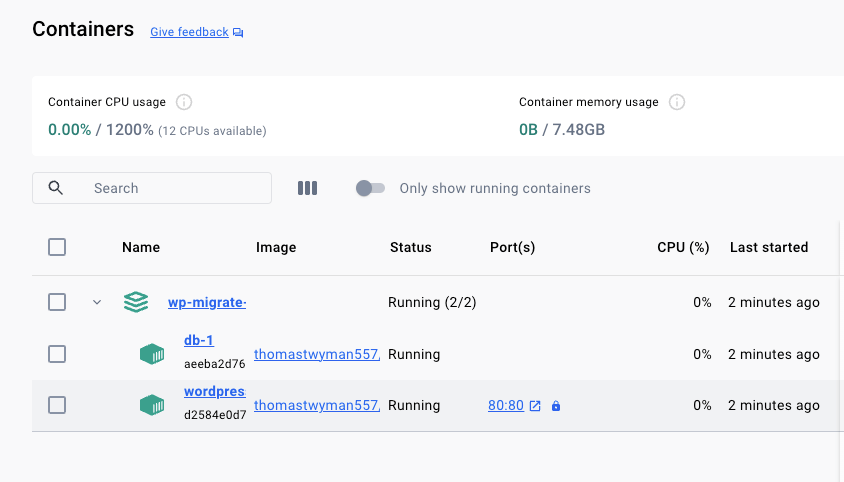
The WordPress and MySQL containers are running. If we look at our volumes, we see the following:

All our volumes are there. If click into the “wpcontent” volume we can see my uploads from this month:
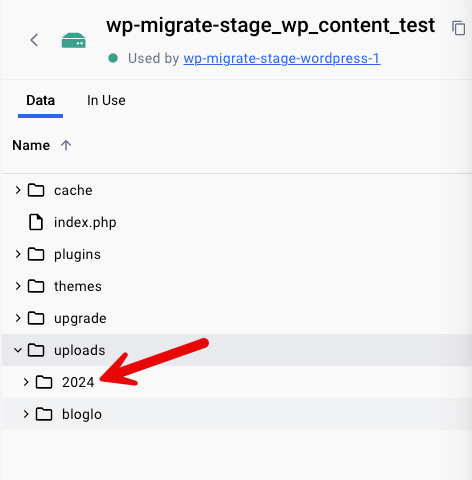
If we go to our browser –

Success! We can see our test blog! Docker Desktop should show us active responses from the WordPress server as well:

Finally, let’s spin down our environment, and turn it back up with production data:
docker compose -f compose-stage.yml --env-file env.stage.test down

[+] Running 3/3
 ✔ Container wp-migrate-stage-wordpress-1  Removed                                                                                                                                                                                   1.2s
 ✔ Container wp-migrate-stage-db-1         Removed                                                                                                                                                                                   0.9s
 ✔ Network wp-migrate-stage_default        Removed                                                                                                                                                                                   0.0s
You will notice in this case I did NOT use the “-v” parameter to also delete the volumes… since the ENV files are creating unique variables to be used for test and prod volumes, we should be able to allow those volumes to persist. Now all I need to do is change one parameter in the command to get my production environment:
docker compose -f compose-stage.yml --env-file env.stage.prod up -dAnd a quick check in my browser shows the following:

Finally, just to prove my point, if we look in Docker Desktop to check the volumes, we see the following:

Notice that the “wordpress” volume is once again in use, but at this time neither of the “test” volumes are – only the “prod” volumes. A quick check of the contents of the “prod” wpcontent volume shows the following:
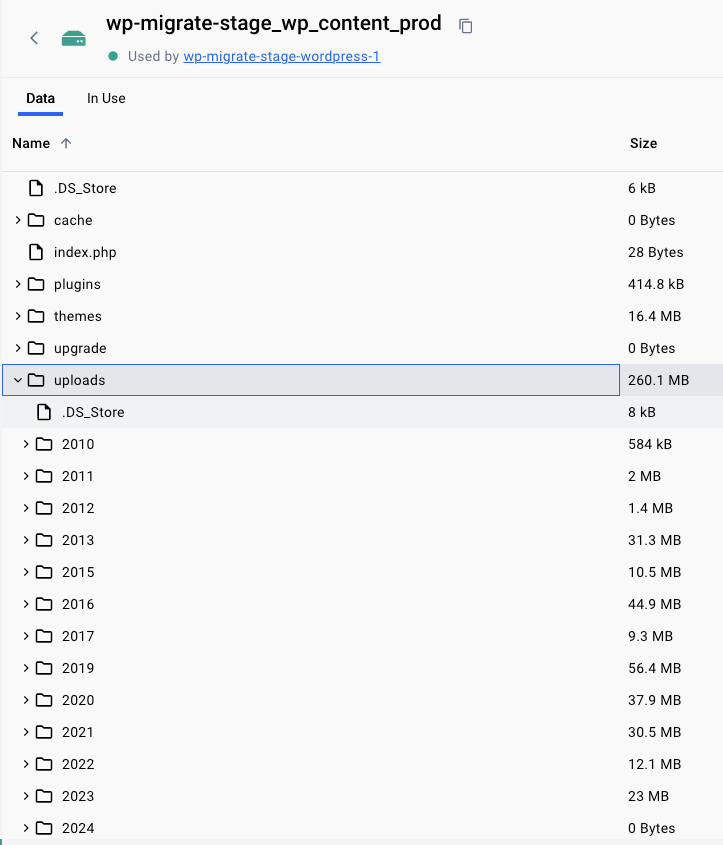
Indeed, the wp-content directory has been populated with the production data, including all my posts / images going back to 2010!
I hope this has been helpful to you – I have certainly learned a lot. In the future, I hope to be able to expand on this use case with Github Actions, and maybe even Kubernetes in the future!
